|
||
|
If you enjoy these games, you will certainly enjoy the games at:
Highly recommended!
PRIVACY
We guarantee that we will never sell, rent, give or distribute your personal information (name, address, email, credit card, etc) to anyone else.
We, too, hate spammers and mad-dog marketeers!
|
Knarly Mazes TutorialKnarly Mazes, while being a simple game in concept, can involve some very complex logic during the solving of the puzzles. On this page, you'll find a sampling of the types of deductions and situations that you'll find (and find useful) within the game. In the diagrams on this page, the BLUE walls are walls that are already known, the dark GREEN proto-walls are walls that can be turned into a wall as a result of a deduction, and proto-walls that are removed as the result of a deduction are crossed-out with a RED-X. The contents of cells that are pertinent to the deduction are shown in purple, red, blue, or green numbers, or are blank (if the cell is completed before the deduction starts). The contents of cells that don't pertain to the deduction are shown as a question mark. Remember, the rule of the game: There must be one and only one path (that doesn't double back on itself) between any two cells of the maze. This means that each cell must be reachable from every other cell, and there can be no "hallways" that are more than 1 cell wide (ie, there can be no 2x2 areas with no interior walls). There can be no walls that are "islands," that don't connect with any other walls, because that would allow a "circular" path around that wall section which would allow multiple paths between some of the cells. Finally, it means that there can be no areas of the maze that are partitioned off from the other parts of the maze. A corollary of the above that might not at first be apparent: every connected group of walls (a wall partition) must connect with the outer side of the maze in one and only one spot. If it didn't connect at all, it would be an island. If it connected in two places, it would partition the maze into separate areas, unreachable from each other. Basic Deductions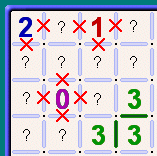
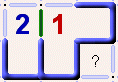
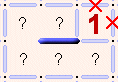
These first ones are very simple and, once you've become aware of them, they will be quite obvious. 1a) You'll frequently see a 2 in at least one of the four corner cells of the maze. Since the outer wall already provides the two needed walls, the other two proto-walls can be removed. 1b) You'll usually see a 1 in some cells along the maze sides. Since the outer wall already provides the 1 needed wall, the other three proto-walls can be removed. 1c) There will frequently be some cells with 0 walls. You can immediately remove all four proto-walls from these. 
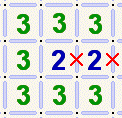
1d) You can always put a wall between adjacent 3-cells. The reason is illustrated to the left. If the proto-wall were removed from between the two 3-cells, each one would be left with only three proto-walls, which would then all have to become walls. If that happened, a box would result, and that would separate those two cells from the rest of the maze. That would be contrary to the rules of the game, so there must be a wall between all adjacent 3-cells. Because deductions 1c) and 1d) are things that only occur once at the beginning of the puzzle, and they are such simple and repetitive deductions, there are checkboxes in the Player-Options dialog that will tell the program to automatically take these actions at the beginning of the puzzle, saving you from having to do it yourself. (You'll need to save your mental energy for the more complex work of solving the rest of the puzzle!) 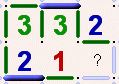 1e) For any cell that still has proto-walls, and the sum of known walls and proto-walls exactly matches the cell wall count, all proto-walls
around that cell can be turned into walls, since they're all needed in order to reach the required total.
1e) For any cell that still has proto-walls, and the sum of known walls and proto-walls exactly matches the cell wall count, all proto-walls
around that cell can be turned into walls, since they're all needed in order to reach the required total.
 1f) For any cell that already has the right number of walls to meet its requirement and that has additional proto-walls, those additional proto-walls can be removed.
Wall Partitions, 3-Cells, and Escape Routes 2a) Remember that there must always be a path from every cell to every other cell. So, when you see an enclosure such as the one to the
left, however large or small, simple or complex, if there's only one way out of that enclosure to the other cells
of the maze and there's a proto-wall across that opening, then that proto-wall can be removed. Sometimes, in the case of a long
narrow hallway, a whole series of proto-walls crossing that hallway can be removed.
2a) Remember that there must always be a path from every cell to every other cell. So, when you see an enclosure such as the one to the
left, however large or small, simple or complex, if there's only one way out of that enclosure to the other cells
of the maze and there's a proto-wall across that opening, then that proto-wall can be removed. Sometimes, in the case of a long
narrow hallway, a whole series of proto-walls crossing that hallway can be removed.
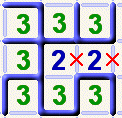
 2b) In this example, the two proto-walls can be removed even though no other walls have been marked. Why? Because a 3-cell is impassable.
A hallway can not go through a 3-cell. It can go into it, but not through it. If you think about it for a bit,
you'll see that a 3-cell has walls connected to all four of its cell vertices (corners). That means that no matter how
the walls of the 3-cells are arranged in this diagram, there is going to be an impassable partition of walls surrounding the pair
of 2-cells, and so the hallway from the 2-cells can only escape through the 2-cells themselves to get to the rest of the
maze. One possible arrangement is shown in order to help you visualize this.
2b) In this example, the two proto-walls can be removed even though no other walls have been marked. Why? Because a 3-cell is impassable.
A hallway can not go through a 3-cell. It can go into it, but not through it. If you think about it for a bit,
you'll see that a 3-cell has walls connected to all four of its cell vertices (corners). That means that no matter how
the walls of the 3-cells are arranged in this diagram, there is going to be an impassable partition of walls surrounding the pair
of 2-cells, and so the hallway from the 2-cells can only escape through the 2-cells themselves to get to the rest of the
maze. One possible arrangement is shown in order to help you visualize this.
 You'll note that the walls surrounding the 3-cells are all connected together forming a single wall partition, and because the 3-cells themselves
surround the 2-cells, the wall partition created by the 3-cells' walls must also surround the 2-cells, leaving only one "escape
route." It is very important that you understand and grok (grasp, perceive, inhale) this principle, as it is the
foundation of many, many deductions.
You'll note that the walls surrounding the 3-cells are all connected together forming a single wall partition, and because the 3-cells themselves
surround the 2-cells, the wall partition created by the 3-cells' walls must also surround the 2-cells, leaving only one "escape
route." It is very important that you understand and grok (grasp, perceive, inhale) this principle, as it is the
foundation of many, many deductions.
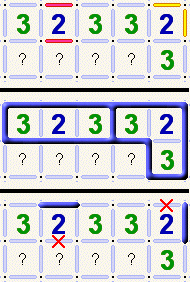 2c) This one is related to deductions 1d) and 2b) above, but slightly more complex. Two similar cases are show in this diagram. In the
top 1/3 of the diagram, the two red proto-walls can not both be walls, nor can the two yellow proto-walls both be walls.
If they were, they would satisfy the needed two walls for the 2-cell, which would then require the removal of the other two
proto-walls of the 2-cell, which would then leave the two surrounding 3-cells with only three walls each. That would then require that
all remaining proto-walls of the 3-cells be turned into walls (as is shown in the middle section of the diagram), which would
result in boxed-in areas. As a result, as soon as one of the red walls or one of the yellow walls becomes known, then the other
wall of the pair can be removed (as shown in the bottom section of the diagram) to allow passage out of the 2-cell to the rest of the maze.
2c) This one is related to deductions 1d) and 2b) above, but slightly more complex. Two similar cases are show in this diagram. In the
top 1/3 of the diagram, the two red proto-walls can not both be walls, nor can the two yellow proto-walls both be walls.
If they were, they would satisfy the needed two walls for the 2-cell, which would then require the removal of the other two
proto-walls of the 2-cell, which would then leave the two surrounding 3-cells with only three walls each. That would then require that
all remaining proto-walls of the 3-cells be turned into walls (as is shown in the middle section of the diagram), which would
result in boxed-in areas. As a result, as soon as one of the red walls or one of the yellow walls becomes known, then the other
wall of the pair can be removed (as shown in the bottom section of the diagram) to allow passage out of the 2-cell to the rest of the maze.
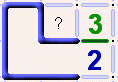 2d) More in the same vein, here we have a "closed area" whose sole escape route is into a 2-cell which has a neighboring 3-cell.
The proto-wall between the 2-cell and the 3-cell must be a wall as without it, the 2-cell and 3-cell would each become enclosed
with the "closed area" forming a box which would be unreachable form the other parts of the maze.
2d) More in the same vein, here we have a "closed area" whose sole escape route is into a 2-cell which has a neighboring 3-cell.
The proto-wall between the 2-cell and the 3-cell must be a wall as without it, the 2-cell and 3-cell would each become enclosed
with the "closed area" forming a box which would be unreachable form the other parts of the maze.
 2e) Very similar to 2d), if you have a 1-cell that is adjacent to TWO "closed areas" AND has a 3-cell next to it, then you can place a
wall between the 1-cell and the 3-cell. Otherwise, (in this example) the wall would have to be above the 1-cell, leaving the proto-wall
between the 1-cell and 3-cell NOT there, which in turn would force all of the other three proto-walls of the 3-cell into walls, which
would then form a closed box. The largeness or smallness of the "closed areas" adjacent to the 1-cell don't matter,
just the fact that their only "escape" is into the 1-cell.
2e) Very similar to 2d), if you have a 1-cell that is adjacent to TWO "closed areas" AND has a 3-cell next to it, then you can place a
wall between the 1-cell and the 3-cell. Otherwise, (in this example) the wall would have to be above the 1-cell, leaving the proto-wall
between the 1-cell and 3-cell NOT there, which in turn would force all of the other three proto-walls of the 3-cell into walls, which
would then form a closed box. The largeness or smallness of the "closed areas" adjacent to the 1-cell don't matter,
just the fact that their only "escape" is into the 1-cell.
 2f) And of course, 2d) and 2e) can be combined as shown in this example. If a 1-cell has two sides both opening into closed
areas of any size, and it is adjacent to a 2-cell with an opening into a closed area of any size, then you can place a wall between
them. Otherwise, the remaining proto-walls of the 1-cell and the 2-cell would be forced into walls, which would then form a closed box.
2f) And of course, 2d) and 2e) can be combined as shown in this example. If a 1-cell has two sides both opening into closed
areas of any size, and it is adjacent to a 2-cell with an opening into a closed area of any size, then you can place a wall between
them. Otherwise, the remaining proto-walls of the 1-cell and the 2-cell would be forced into walls, which would then form a closed box.
 2g) And the final combination of these is two adjacent 2-cells, each of which opens into it's own "closed area." The proto-wall between
them must be a wall, as otherwise the remaining proto-walls would again form a closed box with the "closed areas".
2g) And the final combination of these is two adjacent 2-cells, each of which opens into it's own "closed area." The proto-wall between
them must be a wall, as otherwise the remaining proto-walls would again form a closed box with the "closed areas".
 2h) Frequently you'll see this pattern along a side of the puzzle, two 3-cells separated by one or more 2-cells (the number of two-cells doesn't
matter). In this situation (shown in the top 1/3 of the diagram) you know that at least one of the 2-cells' proto-walls
connecting to the maze's side-wall must be a wall (shown here as green walls... not ALL of these green walls have to be walls,
but at least one of them does). The reason why is shown in the bottom half of the diagram. If none of those proto-walls were
a wall, then you'd end up with a box. How is this useful? If the row (or column, as appropriate) cross-wall indicator says that
there is only one more cross-wall on that row, then (in this example) you know that it has to be one of the cross-walls between
the two 3-cells (no matter how many 2-cells there are between the 3-cells). Therefore, it cannot be any other cross-walls that
are outside of the 3-cells (such as the two shown in the bottom 1/3 of the diagram). Also, in this specific example, you know
that the bottom proto-wall of the 2-cell can't be a wall. However, this last deduction is only applicable when there is only one
2-cell between the 3-cells. When there are more than one 2-cells between the 3-cells, you can only remove the proto-walls outside
of the 3-cells. REMEMBER: this deduction only works if you KNOW that there is one and only one cross-wall between the 3-cells.
This can be deduced in a number of simple and complex situations, but is not always a guarantee.
2h) Frequently you'll see this pattern along a side of the puzzle, two 3-cells separated by one or more 2-cells (the number of two-cells doesn't
matter). In this situation (shown in the top 1/3 of the diagram) you know that at least one of the 2-cells' proto-walls
connecting to the maze's side-wall must be a wall (shown here as green walls... not ALL of these green walls have to be walls,
but at least one of them does). The reason why is shown in the bottom half of the diagram. If none of those proto-walls were
a wall, then you'd end up with a box. How is this useful? If the row (or column, as appropriate) cross-wall indicator says that
there is only one more cross-wall on that row, then (in this example) you know that it has to be one of the cross-walls between
the two 3-cells (no matter how many 2-cells there are between the 3-cells). Therefore, it cannot be any other cross-walls that
are outside of the 3-cells (such as the two shown in the bottom 1/3 of the diagram). Also, in this specific example, you know
that the bottom proto-wall of the 2-cell can't be a wall. However, this last deduction is only applicable when there is only one
2-cell between the 3-cells. When there are more than one 2-cells between the 3-cells, you can only remove the proto-walls outside
of the 3-cells. REMEMBER: this deduction only works if you KNOW that there is one and only one cross-wall between the 3-cells.
This can be deduced in a number of simple and complex situations, but is not always a guarantee.
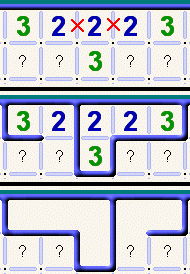 2i) The scenario and reasoning here are similar to 2h), yet different enough (and common enough) to be worth pointing out. You have two 3-cells
along a side of the maze (this can happen in the middle of the maze, but most often you see it along a side) separated by a string
of 2-cells. Additionally, there is one or more 3-cells one row in from the side. Further (as in 2h), using the row cross-wall
indicator, you've deduced that there has to be one and only one cross-wall between the two 3-cells. In that case, the
two proto-walls shown can NOT be walls. The reason is shown in the second two parts of the diagram, that one side or the other
will be forced into a box. It doesn't matter how many 2-cells are between the 3-cells, but it needs to be more than two, or
else it devolves into a simpler case similar to 2b). This same scenario can be invoked without the 3-cell that is one row
in from the side. Imagine that the proto-wall between the central 2-cell and 3-cell (parallel to the side of the maze) was known
to be a wall. Then it doesn't matter whether the 3-cell below it is a 3-cell or not, this same deduction still applies.
2i) The scenario and reasoning here are similar to 2h), yet different enough (and common enough) to be worth pointing out. You have two 3-cells
along a side of the maze (this can happen in the middle of the maze, but most often you see it along a side) separated by a string
of 2-cells. Additionally, there is one or more 3-cells one row in from the side. Further (as in 2h), using the row cross-wall
indicator, you've deduced that there has to be one and only one cross-wall between the two 3-cells. In that case, the
two proto-walls shown can NOT be walls. The reason is shown in the second two parts of the diagram, that one side or the other
will be forced into a box. It doesn't matter how many 2-cells are between the 3-cells, but it needs to be more than two, or
else it devolves into a simpler case similar to 2b). This same scenario can be invoked without the 3-cell that is one row
in from the side. Imagine that the proto-wall between the central 2-cell and 3-cell (parallel to the side of the maze) was known
to be a wall. Then it doesn't matter whether the 3-cell below it is a 3-cell or not, this same deduction still applies.
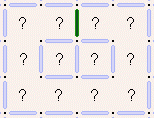
Dangling Walls and Islands 3a) Whenever you see a 2x2 cell area like that shown to the left, that has only one proto-wall connected to the central vertex, that proto-wall must
become a wall in order to keep the "one and only one path" rule from being broken. Without the dangling proto-wall, then
there would be two ways to get from the upper-left cell to the lower-right cell, one clockwise through the upper-right cell and
one counter-clockwise through the lower-left cell.
3a) Whenever you see a 2x2 cell area like that shown to the left, that has only one proto-wall connected to the central vertex, that proto-wall must
become a wall in order to keep the "one and only one path" rule from being broken. Without the dangling proto-wall, then
there would be two ways to get from the upper-left cell to the lower-right cell, one clockwise through the upper-right cell and
one counter-clockwise through the lower-left cell.
 3b) Similar to 3a), if all of the walls and proto-walls of a group of cells (the two center cells in this example) are connected
to other walls and proto-walls by a single proto-wall (the green one in the diagram), then that single proto-wall must be a wall
in order that an island is not formed. Otherwise, there would be a "circular" passageway around that group of
cells, allowing more than one pathway between two cells which would, again, break the "one and only one path" rule.
3b) Similar to 3a), if all of the walls and proto-walls of a group of cells (the two center cells in this example) are connected
to other walls and proto-walls by a single proto-wall (the green one in the diagram), then that single proto-wall must be a wall
in order that an island is not formed. Otherwise, there would be a "circular" passageway around that group of
cells, allowing more than one pathway between two cells which would, again, break the "one and only one path" rule.
 3c) In this situation, there are two proto-walls still connected to the central vertex, and you know that one of them has to be a wall (see 3a
above), and the cell can only have one wall, therefore you know that the two "back" walls of the two cell can not
be walls. So, any proto-walls in those positions can be removed.
3c) In this situation, there are two proto-walls still connected to the central vertex, and you know that one of them has to be a wall (see 3a
above), and the cell can only have one wall, therefore you know that the two "back" walls of the two cell can not
be walls. So, any proto-walls in those positions can be removed.
 3d) A similar situation would be if the 1-cell in 3c) was a 2-cell and one of the back walls was known to be a wall (either one). That would
leave only one remaining wall for the cell, and it would have to be one of the two proto-walls connected to the central vertex.
Therefore, the other back proto-wall can be removed.
3d) A similar situation would be if the 1-cell in 3c) was a 2-cell and one of the back walls was known to be a wall (either one). That would
leave only one remaining wall for the cell, and it would have to be one of the two proto-walls connected to the central vertex.
Therefore, the other back proto-wall can be removed.
 3e) Yet another similar situation is shown here. There's a dangling wall connected in only one place, to a 1-cell. The dangling wall could be a large,
complex series of walls, as long as it's unconnected by any walls or proto-walls except for the one connected to the 1-cell. In
this situation, you know that one of the two proto-walls connected to that dangling wall must be a wall in order to "anchor"
the dangling wall(s) to the side and prevent it (them) from becoming an island. That then satisfies the 1-cell, and so the two back
proto-walls can be removed. This scenario can be extended from the 1-cell to a 2-cell in the same way that it was in 3c)
and 3d). This deduction is one that you'll see quite often in the larger, more difficult puzzles, once you learn to look
for it.
3e) Yet another similar situation is shown here. There's a dangling wall connected in only one place, to a 1-cell. The dangling wall could be a large,
complex series of walls, as long as it's unconnected by any walls or proto-walls except for the one connected to the 1-cell. In
this situation, you know that one of the two proto-walls connected to that dangling wall must be a wall in order to "anchor"
the dangling wall(s) to the side and prevent it (them) from becoming an island. That then satisfies the 1-cell, and so the two back
proto-walls can be removed. This scenario can be extended from the 1-cell to a 2-cell in the same way that it was in 3c)
and 3d). This deduction is one that you'll see quite often in the larger, more difficult puzzles, once you learn to look
for it.
 3f) This one's more complex, but is a good exercise in looking at suspicious situations and spotting "gotchas" in your mind. The
first thing we notice is that in the bottom-left we have a 2x2 cell like that described in 3c), so we know that the back
proto-walls (in this case just the upper proto-wall of the left-most 1-cell) can not be a wall. Now, one of those two remaining
proto-walls must be the wall for the left-most 1-cell, but no matter which one it is, the left end of the center known-wall
will be left dangling, unconnected to any other walls on the left end. Because of that, it must be connected on the right
end. Therefore, the bottom proto-wall of the right-most 1-cell must be a wall, which then eliminates the other two proto-walls
from that cell.
3f) This one's more complex, but is a good exercise in looking at suspicious situations and spotting "gotchas" in your mind. The
first thing we notice is that in the bottom-left we have a 2x2 cell like that described in 3c), so we know that the back
proto-walls (in this case just the upper proto-wall of the left-most 1-cell) can not be a wall. Now, one of those two remaining
proto-walls must be the wall for the left-most 1-cell, but no matter which one it is, the left end of the center known-wall
will be left dangling, unconnected to any other walls on the left end. Because of that, it must be connected on the right
end. Therefore, the bottom proto-wall of the right-most 1-cell must be a wall, which then eliminates the other two proto-walls
from that cell.
 3g) This is a variation (or extension) of 3d). The 2-cell has TWO vertices that are dangling. If the "back" wall (the one that
is X'd out) were a wall, then no matter which of the other three walls became the second wall, you would either be left with an
island or an open 2x2 area, neither of which is legal. Therefore the back wall cannot be a wall and can be removed.
3g) This is a variation (or extension) of 3d). The 2-cell has TWO vertices that are dangling. If the "back" wall (the one that
is X'd out) were a wall, then no matter which of the other three walls became the second wall, you would either be left with an
island or an open 2x2 area, neither of which is legal. Therefore the back wall cannot be a wall and can be removed.
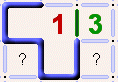
Row And Column DeductionsAll of the examples here will be done as rows, but the same applies for columns. This can be extended to a row with three cross-walls remaining to be placed, and three individual cells do not share any sides and all of which must have at least one cross-wall. This is rarer, though, and more than three is almost never seen. Be very careful with multi-cell deductions like this! If any of the cells are adjacent, so that they share a cross-wall, then you can't count them!!! Because together, they could have 1, 2, or 3 cross-walls. In general, with rows and columns, you should scan for either very low ratios or very high ratios of required cross-walls to remaining proto-cross-walls. It's at these two extremes that you're most likely to find situations where you can deduce where walls have to be or can't be. When you're looking at a very low ratio (1/8 for example), you're going to be looking for a situation where you can think, "At least one of these has to be a wall." When you're looking at a very high ratio (7/8 for example), you're going to be looking for a situation where you can think, "At most one of these can be a wall." 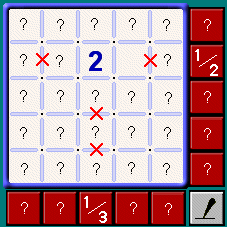 4i) This one is slightly more complex and seen less frequently, but can still sometimes be very helpful on the larger, more difficult puzzles.
If you have a row with only one cross-wall remaining to be placed and a column with only one cross-wall remaining to be placed,
and the cell where the row and column instersect is a 2-cell, and that 2-cell has no walls marked yet (ie, it has three or four
proto-walls and no known walls), then all other proto-cross-walls in that row and that column can be removed. Since the 2-cell must
have two walls, and at most one wall can be in the row and at most one wall can be in the column, that single cell exhausts
all remaining cross-walls for both the row and the column.
4i) This one is slightly more complex and seen less frequently, but can still sometimes be very helpful on the larger, more difficult puzzles.
If you have a row with only one cross-wall remaining to be placed and a column with only one cross-wall remaining to be placed,
and the cell where the row and column instersect is a 2-cell, and that 2-cell has no walls marked yet (ie, it has three or four
proto-walls and no known walls), then all other proto-cross-walls in that row and that column can be removed. Since the 2-cell must
have two walls, and at most one wall can be in the row and at most one wall can be in the column, that single cell exhausts
all remaining cross-walls for both the row and the column.
|